Pages

Wednesday, April 30, 2014

Going Purple with The Card Concept

Hello Everyone!

We have a new challenge up  on The Card Concept Blog and if you are a fan of this year's Pantone Color of the Year, then you are in luck!  The new Card Concept challenge is to make a card in Monochromatic Purple! I hope you play along with us!


I used a Die~Namites Die for the background doily and painted it with two different shades of purple Silks.  It looks much better irl because you can see the gorgeous shimmer of the mica in the paint.  The background panel and circle behind the vellum were stamped with the sweetest little rose image from a Crafty Secrets stamp set.  I think it must be retired as I cannot find it online and I picked it up for a steal at a scrapbook convention. 
The white panel behind the doily is dry embossed; then I inked up the edges of the paper with Versamark ink and dragged the edges of the paper through gold embossing powder.  
The sentiment is embossed in gold on vellum and a small ring of Sahara Sand cs was made to fit around the sentiment to define the vellum panel better.  
The leaves and flowers were made with Heartfelt Creations dies. 
The dry embossing and gold heat embossing, layers, handmade flowers, pearls and vellum all come together as a classy and elegant card.  What style do you prefer?

For more amazing inspiration, check out all of the Design Team samples on the Card Concept Blog


Thanks for stopping by; have a blessed week!

Lee Ann  :)

Supplies used-
Stamps-Crafty Secrets, Heartfelt Creations Open Leaf Precut Set
Paper-Flourishes white cs, SU vellum, Very Vanilla, Sahara Sand
Ink-Versamark, Crumb Cake, Memento Tuxedo Black
Other- Die~Namites Spring Doily die, Heartfelt Creations Classic Leaf die and Vintage Floret die, MFT Circle Stax Die-Namics, gold ep, SU Polka Dot ef, pearls, Silks paint, Copics

Tuesday, April 29, 2014

Seize the Sketch and Heartfelt Creations Alum Blog Hop

Hello All!

Here it is, the end of April already.  It is time for a new sketch from Seize the Sketch.  It also means it is time for another Heartfelt Creations Alumni Bog Hop!  If you are following along, you should have arrived here from Glenda Brooks' blog.  If not, you may want to start at the beginning, at Giovana Smith's blog.
 You have until Friday, May 2, 2014 at Midnight (EST) to hop along and comment for a chance to win.  The more blog hop participant's blogs you comment on, the greater your chances of winning!
Today I am sharing a Missing You card I made using this week's great sketch from Seize the Sketch brought to us by Jessi.


I replaced the banners in the sketch with a fussy cut, pewter embossed, ornate border image from the All Seasons Gazebo Set.  Yet again I have used the trendy emboss on vellum technique for the ornate border image and the sentiment. I had a terrible time trying to photograph the embossed sentiment, so please pardon my photo. 
The image is from the Summer Season Set and is colored with Copics. 
When making this card, I imagined the sender to be reminiscing about days gone by.  The image of laundry on the line certainly takes me back to my childhood. I sure wish clothes lines would make a comeback!  They remind me of simpler times. And I loved the smell of sheets that dried on the line! 

Here is your Alumni Blog Hop list; enjoy the hop!

Giovana Smith
Vicki Dutcher
Emilia van den Heuvel
Amarilys Doria
Cibele Glazer
Glenda Brooks 
Lee Ann Barrett 
Candy Slabaugh
Mary Faus
Alissa Wells
Lisa Allen

For more sketch inspiration from the a-mazing Seize the Sketch team, you can check out the blog here.   

Thanks so much for stopping by and have a blessed week!

Lee Ann  :)

Supplies Used-
Stamps- Heartfelt Creations All Seasons Gazebo, Summer Season, Classic Message Set (sentiment)
Paper- SU Early Espresso,Flourishes white cs, Heartfelt Creations Daphne Paper Collection 
Ink- Memento Tuxedo Black, Versamark
Other- pewter embossing powder, seam binding, Spellbinder Oval Dies, Copics
Friday, April 25, 2014

Sweet 'n Sassy Homes

Hi Everyone!

Welcome to Sweet 'n Sassy Stamps Friday Feature Blog Hop and Challenge, featuring the new release, Happy Home


I colored my house and trees with Copics and fussy cut them out.  The sky is a piece that I had made for another project and did not like the way it turned out.   I used a stencil, reinkers and a water brush to create the background.  The background looks much better in smaller quantities!  :)
The sun is from another new release, Happy, Happy and was stamped on cardstock and cut out with its matching die.  I stamped it again on dp and fussy cut the center out.  


This darling set~
  • Measures approximately 4" x 4"
  • The large houses measures approximately 1 1/8" x 1 3/8"
  • Is designed by Diane Zechman
  • Is priced at $11
                                                    

Our challenge to you this week is to use a house or a home on your card or project!
The first  cards in the hop were created for your inspiration by the design team.  As you hop along, leave a little love behind, then create your own Mother's Day card and use the linky tool to add it to the gallery!

Just a few guidelines to remember as you play:
         
- You don't have to use a Sweet 'n Sassy image to enter (although we sure love when you do!)
 - You'll have until Thursday, May 1st at midnight EST to enter
- We'll draw 1 winner from this week's challenge to receive a $10 credit to Sweet 'n Sassy Stamps!
- Please use code SNSFFC9 when uploading to Splitcoaststampers or other galleries
Share a link to your creation below.

Thanks for joining us today!  Be sure to check back again on Friday, May 2nd to see if you won and to check out the next Friday Feature & Challenge!


Have a blessed week and thank you for your sweet comments!

Lee Ann :)

Supplies Used-
Stamps- Sweet 'n Sassy Stamps Happy Home, Happy Happy
Paper- watercolor paper, SU Brown Sugar, Daffodil Delight, Very Vanilla, Old Olive, SU dsp , Flourishes white cs
Ink- Pool Party, So Saffron
Other- Sweet 'n Sassy Stamps Fence die, Happy Happy matching dies, Copics, SU white baker's twine, button and On Film Framelits

Thursday, April 24, 2014

Mothers are Die~Namite!

Howdy Die~Namites Fan!!
We WELCOME you to our
CELEBRATE MOM Blog Hop


Mom, when thoughts of you are in our hearts, 
we are never far from home. ~Author Unknown

Did you know Die~Namites Dies are Made in America??
and are compatible with most die-cutting machines on the
market today. Die~Namites dies will cut cardstock,
patterned paper, fun foam, wool blend felts, craft foils
handmade papers and more!
Shimming may be required for some thicker materials,
just add one at a time and test frequently.

Do you want to keep updated on the latest releases
and creations made with our FABULOUS DIES!
You can do so by.....
LIKE”ing us on Facebook??
Also, by becoming a Follower of our blog???

As you are hoppin’, make sure to leave a comment on each of the
Design Team Member’s blogs....
several of our Randomly chosen Gift Certificates
will be chosen from your comments on their blogs.

You will have until Midnight EST to leave your comments
and to be eligible for our
Grand Prize of a
$50 Gift Certificate
additionally
5 - $10 Gift Certificates

Are you ready to see what our Design Team has created for you??
If you have arrived here from Die~Namites’s blog, your are in the right place,
if not head back to the Die~Namites blog to begin the hop.


 I used the Love Arrangement Die, perfect for a Mother's Day bouquet!
 

I die cut multiple colors with the Love Arrangement die.  I used a green die cut for my base and adhered it to a piece of white cs, making sure all of the little pieces were adhered, so none of the little pieces would fall out.  Once it had dried, I trimmed away all of the white that overlapped the edges so it was not visible.
Next, I started cutting apart my yellow roses and gluing them to the green cs.  I used a lighter yellow to highlight the rose petals.  I followed that by cutting apart the daisies and gluing them down.


 The hearts were last and for each of the 3 centers of the hearts, I popped them up on dimensionals.


I wanted to have the look of cascading flowers and I really love the sweet little daisies so I die cut the Love Arrangement die another time in white and cut the flowers apart.  
The daisies were added, along with additional sprigs of green leaves to the lower portion of the circle/bouquet. 


I finished off the bouquet with a 'floral pick' with my sentiment stamped on it.  

To jump start my MOJO, I used a sketch from Craft Hoarders Anonymous, and the twist of the challenge, to use one old item (pink dp) and 1 new item (blue dp).


Now, head on over to Peggy Baker’s blog
to continue the hop.
Thank you for joining our blog hop!!

Thanks for visiting and for your sweet comments!  
Have a blessed day!

Lee Ann  :)

Supplies Used-
Stamps- Sweet 'n Sassy Stamps Precious Poppies 
Paper- Neenah Solar White, SU Barely Banana, So Saffron, Daffodil Delight, Blushing Bride, Old Olive, Naturals Ivory, SU dsp, Nature Gmund Savanna woodgrain textured cardstock from CutCardStock
Ink- Memento Tuxedo Black
Other- Die~Namites Love Arrangement Die,  scallop punch, Hemptique twine, dimensionals

Tuesday, April 22, 2014

Love Birds

Hello Everyone!

Today I am up on the Sweet 'n Sassy Stamps Blog with this card.  If you know me at all, you know that I LOVE all things nature, so I was all over this brand new Sweet 'n Sassy stamps set, Love Birds.


You cannot go wrong with these great stamps and with the great cardstock from CutCardStock.
For the background, I stamped the tree background from Tender Thoughts in Baked Brown Sugar on some Savoy 100% Cotton Cardstock that has a great, subtle texture.  I used the matching Birch Tree Die to cut it out, and then backed it with a beautiful soft blue- Berrylicious-from the Pop Tones Pack at Cutcardstock.
Now for the really amazing part- I absolutely adore this textured white paper, Nature Gmund Savanna Cardstock.  It is just gorgeous, with a woodgrain texture.  I tried to get a close up picture for you~


Seriously, I just love this stuff!  I cannot decide whether to hoard it or to use it on every project I make!
  For this project, I used this amazing cardstock for both my background mat and the square window framing my scene.
The birds are stamped on Neenah Cryogen White Cardstock- it has a wonderful sparkle to it- and colored with Prismacolor Pencils. I used the matching Love Birds Die to cut them out. The Tree branches are stamped on Brown Bag Kraft cardstock and also colored with Prismacolor Pencils and cut out with the matching die.
All of the parts were assembled and then adhered to a gorgeous metallic base- Shadow- one of the colors in the Curious Metallic Sample Pack.
I finished off the card with my sentiment from the Love Birds set stamped on Vellum and then heat embossed using gold embossing powder.  What a gorgeous trend this is!


 I am getting this in just under the wire for Simon Says Stamp Wednesday challenge, Animal Antics
Thanks so much for stopping by and have a blessed week!

Lee Ann  :)

Supplies Used-
Stamps- Sweet 'n Sassy Stamps Love Birds, Tender Thoughts
Paper- CutCardStock Savoy 100% Cotton Cardstock, Poptones Cardstock, Curious Metallic Sample Pack, Brown Bag Kraft Cardstock, Nature Gmund Savanna WoodGrain Textured Cardstock, Stampin Up Vellum
Ink- Memento Tuxedo Black, SU Baked Brown Sugar, Versamark
Other- Prismacolor Pencils, Gold ep. Sweet 'n Sassy stamps Love Birds Matching Dies, Birch Tree Dies, MFT Circle Stax Die-Namics, seam binding

Saturday, April 19, 2014

Thanks, Mom

Hi Everyone!

I love Fusion Challenges and could not resist playing along this week using their sketch.  I used one of my new dies from Die~Namites to frame my sentiment.


For texture, I  used some strips of seam binding and created a panel using a basket weave with the strips.  I dry embossed the background panel and the pale yellow oval.  The pansies are cut from the Nana's Flowers Die and painted with Luminarte Silks Acrylic Paint.  I layered them up for dimension. 


The sentiment is from a brand new Sweet 'n Sassy Stamps set, Thankful Innies, and no, we are not talking about belly buttons!  I stamped it then fussy cut it apart to fit the curves of the flowers and oval.  Prima pearls finish off the card.
I am also linking this up to Craft Hoarders Anonymous, where this week's challenge is to use a stamp!

Thanks so much for stopping by and have a Very Blessed Easter!

Lee Ann  :)

Supplies Used-
Stamps- Sweet 'n Sassy Stamps Thankful Innies
Paper- Stampin' Up Naturals Ivory, So Saffron, Crumb Cake
Ink- Versafine Black
Other- Die~Namites Nana's Flowers and Love Arrangement, Spellbinders Ovals, Spellbinders Embossibilities,  SU Oval ef, Luminarte Silks, dimensionals, Prima pearl flourishes

Friday, April 18, 2014

Thanks to Mom

Hello Everyone!

Welcome to Sweet 'n Sassy Stamps Friday Feature Blog Hop!  Today we are featuring theses gorgeous blossoms and leaves from Thankful Blooms, Thankful Blooms Die Set, as well as the Mother Die and Thankful Innies.


  • Stamp set measures approximately 4" x 6"
  • The largest bloom measures approximately 2" x 2 1/4"
  • Designed by Korin Sutherland
  • Stamp set priced at $15
  • Die set priced at $15.25

  • Die measures approximately 3 3/4" x 1"
  • Designed by Korin Sutherland
  • Die priced at $7.25


  • Stamp set measures approximately 6" x 4"
  • The Tender care sentiment measures approximately 2 1/2" x 1 1/2"
  • Designed by Korin Sutherland
  • Stamp set priced at $15

I am loving the new trend of gold embossing, particularly on vellum.  For my leaves, I stamped them and then dicut them out with the matching dies.  Using my Versamarker, I lined the veins of the leaves with Versamark ink and then heat embossed them with gold embossing powder.
My scalloped edge was die cut in vellum; then I used my Versamarker again and outlined the scalloped edge with the Versamark ink and heat embossed it with gold embossing powder. 
To make my flowers, I stamped them once and die cut them, then stamped them a second time, stamping off once first.  I hand cut along the petal lines to make my lighter inner petals.
'Mother' was die cut once in Coastal Cabana and 3 times in white, stacking them and adhering them together to create a dimensional word die cut.

Be sure to check out all of the inspiration using these new sets and dies by visiting the Design Team Members' blogs below; as you hop along, please leave a little love!~


Thanks so much for stopping by and I hop you enjoy the hop!

Lee Ann  :)

Supplies Used-
Stamps-Sweet 'n Sassy Stamps Thankful Blooms
Paper- Flourishes White cs, SU Coastal Cabana, vellum, Sahara Sand
Ink- Calypso Coral, Primrose Petals, Sahara Sand
Other- Versamarker, Gold ep, SU twine, SU Vintage Faceted Buttons, Sweet 'n Sassy Stamps Mother Die, Thankful Blooms Die Set, Borders and Background Die Set, Stampin' Up embossing folder


Tuesday, April 15, 2014

Seizing a New Sketch!

Hello Everyone!

There is a brand new sketch from Jessica over on the Seize the Sketch Blog today. It is a super versatile sketch and will jump start anyone's MOJO! 


I used this great retro image from Pink Persimmon and added some of my favorite MME dp along with a muslin strip, MME embellishments, and my all time fave twine- no card is complete without Hemptique twine! 
Feel free to change up the shapes, just I have here, changing the oval to a rectangle and a star to a bow; just as long as the sketch is recognizable.  I hope you can join us!
Check out all of the other wonderful inspiration from the Design Team on the Seize the Sketch Blog

I am entering this in the Craft Hoarders Anonymous Challenge, to use a stamp and at 613 Avenue Create- Anything Goes.

Have a blessed day!

Lee Ann  :)

Friday, April 11, 2014

Die~Namite Blossoms

Hello Everyone!

Today I am up on the Die~Namites blog sharing this card, which is a bit out of the ordinary for me, but this Die~Namites Spring Blossoms Die was just calling to me to be used for an Asian theme.


  I searched the internet for some inspiration and found an amazing photo which inspired this card~


Is this not gorgeous!?  When I saw this pic, I knew I needed to try to turn it into a card.  I used my Die~Namites Spring Doily to make the decorative corners.  I die cut a doily out in white and then heat embossed it with gold embossing powder.

The Spring Blossoms Die was first cut out in black cardstock and then I cut the flowers out in red cs two times.  The first red blooms were adhered to the black die cut.  The second layer of red blooms were molded and then adhered over the first layer of red flowers.


For the background, I hand cut a mountain mask and sponged on Blushing Bride ink.  I used the Sweet 'n Sassy Stamps Serene Silhouettes for my bird image and the Vintage Seed Packet set for the sentiment.    I love this sentiment-it is one I am trying to keep very close right now- working on seeing things with a God perspective.  Boy, if that isn't difficult!  I have come to the conclusion that I am very impulsive.  But, I know that I can count on Him to change me from the inside out- if I let Him.

This week, Simon Says Stamp Monday Challenge is all about 'Journey' .  I would love to Journey to China some day to see the Great Wall and the Terra Cotta Warriors. 
At 613 Avenue Create the Challenge is Sights/Sounds/Smells of Spring. 

Thanks so much for stopping by and have a blessed week!

Lee Ann  :)

Supplies Used-
Stamps- Sweet 'n Sassy Stamps Serene Silhouettes and Vintage Seed Packet
Paper- Flourishes white cs, SU Real Red and Basic Black cs
Ink- SU Blushing Bride, Versafine Black
Other- gold ep, Die~Namites Spring Blossoms Die, Die~Namites Spring Doily Die, Pearls, dimensionals

Monday, April 7, 2014

Traveling with CutCardStock- Well, Sort of!

Hello Friends!

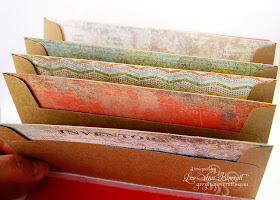
Today I am sharing on the CutCardStock Blog and have made a travel journal book using some great cardstock and envelopes. I am headed to the Southwest this summer, and frankly, I cannot wait!  I am an avid collector of all things memorabilia on trips and wanted to make a journal of sorts. 
Here is my finished project~

 
I repurposed envelopes for this project, and to make things even better, they are earth friendly, Brown Bag Envelopes from CutCardStock.  I used some Stampin' Up dsp for embellishing my journal along with my absolute favorite twine, Hemptique.  The stamp is from a new company called Fun Stampers Journey.  The cover is an awesome color, Tangelo, and is from the CutCardStock Flavours Gourmet Collection. 
Here is the inside of the journal~

 
 You get get compete and detailed instructions on how to make this journal on the CutCardStock Blog. 


Thanks so much for stopping by today! 

Have a blessed week!

Lee Ann  :)

Supplies Used-
Stamps- Fun Stampers Journey
Paper- CutCardStock Tangelo, SU dsp
Ink- Versafine Black
Other- Hemptique Twine, CutCardStock Brown Bag A7 Envelopes, SU Simply Scored Scoring Tool

Friday, April 4, 2014

Challenges and a Sneaky Peek

Hi Everyone, and a VERY Happy Friday!

This week did me in!  So glad we have Saturday and Sunday to recharge!  Tonight I decided to sneak in a last minute challenge or two and also played with some fabulous new Sweet 'n Sassy Stamps to be released next week. 


Please excuse the bad photo.  These night time shots are so hard to get for me.  Hopefully we will have sunshine tomorrow.
I used Prismacolor Pencils on Crumb Cake cs and then added layers, and sentiment banner and a cheery sun, also colored in Prismacolor Pencils. 
Here is the Retrosketches sketch I used, although by the time I was done with it, I had taken some liberties with it!


As far as the colors are concerned, I used this great combo from Color Throwdown~


Thanks so much for stopping by; time for me to relax and call it a night! 

Have a blessed weekend!

Lee Ann  :)

Supplies Used-
Stamps- Sweet 'n Sassy Stamps, soon to be released
Paper- Flourishes white cs, SU Pool Party, Crumb Cake
Ink- Versafine Black
Other- snss sun die, snss Scalloped border dies, Prismacolor Pencils, MFT Fishtail Flag Stax Die-Namics, dimensionals, Wink of Stella glitter pen, SU Dazzling Details

Wednesday, April 2, 2014

The Card Concept wants Butterflies!

Hello Everyone!

Welcome back to another challenge from The Card Concept.  It is April and that means spring for so many of us.  This week, we are looking for butterflies- a sure sign of spring!

 Once again, I created in the elegant and classy style.  I used lots and lots of layers and texture on my card and added shine with heat embossing and Champagne Mist Shimmer Paint.


One would think using a butterfly on a card would be pretty easy, but I was running low on mojo.  I went looking for some sketch inspiration to get me going, and landed on the Fusion Challenge site where I spotted the inspiration/sketch photo.
 While I liked the sketch (and used it), I fell in love the the inspiration photo with all of its gorgeous texture.  And I loved the colors as well.  More Mustard was always one of my favorite colors, so when it was retired, I was very sad to see it go.


I took the inspiration pretty literally, as I used actual muslin on my card.  I stamped the muslin with a post mark image and the word 'Postcard' as well as script text, mimicking the dress form in the photo.  The butterfly was stamped on More Mustard cs and then shading was added with Copics.
Check out all of the inspiration on The Card Concept Challenge Blog; there is sure to be something for everyone with all of the styles that are represented- CAS, clean and graphic, clean and layered, collage, shabby chic/vintage, and elegant and classy.  

Have a blessed day! 

Lee Ann  :)

Supplies Used-
Stamps- Sweet 'n Sassy Stamps Majestic Monarchs, Vintage Postcard and Decorative Frames; Heartfelt Creations Large Elegant Word Background Stamp
Paper- SU Black, Naturals Ivory, Smokey Slate, More Mustard, Really Rust, vellum
Ink-Memento Tuxedo Black, Versafine black, Versamark
Other-Sweet 'n Sassy Stamps Majestic Monarch Dies, Wood grain ef, SNSS Decorative Plaque Dies,  black ep, burlap, Cheery Lynn Designs Flourish Die, SU butterfly embosslit, Spellbinders Rectangle dies, SU wood butterfly, SU Glimmer Paint in champagne

Tuesday, April 1, 2014

A New Sketch from Seize the Sketch!

Good Morning Everyone! 

It feels so good to say it is April 1st!  Not because is it April Fool's of course, but because the very word, April, sounds like spring!
 I used a springy new, soon-to-be-released  Sweet 'n Sassy Stamps set for my card for this week's Seize the Sketch sketch-


Here is your sketch~


As you can see, I took a few liberties with the sketch because, well, because I never seem to be able to follow the rules! 
This stamp set is so stinkin' cute- I just love the nest, which I stamped and colored twice, cutting out the second one and popping it up on dimensionals.  All of the images have matching dies, but of course, when I was making this card, I did not think I had them or lost them or just plain wasn't sure if I indeed had them or not-so I fussy cut out the tree branch and nest.  I tucked a few strands of burlap in between the two nests for a bit of texture. I embellished my fab Hemptique bow with a paper button that I made with my new PTI dies.  There is a clear heart shaped SU button on top of them, but it is hard to see in the pic. 
There is so much great inspiration on the Seize the Sketch Blog; stop by to see what the ladies have made for you!  Hope you can play along with us!

Thanks so much for stopping by and have a blessed April!  ;)

Lee Ann 

Supplies Used-
Stamps-Sneak peek of a soon to be released Sweet 'n Sassy Stamps set
Paper- Flourishes white cs, SU Early Espresso, Pumpkin Pie, Crumb Cake; dp ancient and unknown!
Ink-Memento Tuxedo Black
Other- Copics, Sweet 'n Sassy Stamps matching dies, PTI Button Stacks Die, Hemptique twine, SU clear heart button, dimensionals, SU polka dot ef, SU vintage brads, SU oval framelits, Tim Holtz woodgrain ef