Pages

Thursday, September 25, 2014

Something New from Top Dog Dies!

Hi Everyone! 
I have more Top Dog Dies inspiration today, and what is even better, is that I have used soon-to-be-released new product! 


Don't you just love that decorative edge??!  This is one of 5 new Signature Dies.  The signature dies are the steel rule dies that allow you to cut multiples of the die in one pass.  You can also cut some seriously thick stuff, like chipboard, with these dies. 
I have used the Delilah Die today (it will be available on September 26th).  Instead of cutting multiples or thick materials, I used it to cut decorative edges.  
My main image is from the Top Dog Dies Dog Days #1 die set.  I embellished the card with some twine and a dog tag made with a die from the Dog Days #2 die set and some Add a Little Dazzle craft metal.   The sentiment is from a fabulous set from Our Daily Bread Designs, Paw Prints.
You can find a complete tutorial for this card on the Top Dog Dies Blog

Thanks so much for stopping by and have a blessed day!  

Lee Ann :)


Wednesday, September 24, 2014

More Dazzling inspiration

Hello Everyone!

We are back with a new challenge at Add A Little Dazzle! This week we are working with colors, and some beautiful ones at that!


Here is your inspiration photo~


The challenge is to use any three of the following colors- Brushed Bronze, Outrageously Orange, Glimmering Gold, Dark Chocolate, Copper.

I chose to cut my Sweet 'n Sassy Stamps trees from Brushed Bronze, Dark Chocolate, and Glimmering Gold Add A Little Dazzle craft metal sheets.  I actually used the Inlaid Die technique here and backed the trees with the same cardstock as the top panel- PTI's Rustic Cream cardstock.
I embossed the bottom portion of the front panel with a wood grain ef and then ran a piece of natural ribbon and a strip of Glimmering Gold craft metal across the card, dividing embossed and non-embossed areas.  
The sentiment is from one of my favorites,  Sweet 'n Sassy Stamps Across the Miles Stamp Set.  I heat embossed this in gold on a vellum banner.  My 3 buttons are SU's faux wood buttons and I have added a bit of Hemptique cord to each.  I am linking this up to Simon Says Stamp Wednesday 'Anything Goes' challenge

These colors are perfect for making a masculine card- hope you can play along with us!  You do not have to use craft metal, but if you have it we would love it if you did!  As always, there is a prize for one lucky winner!
 
If you just have to have some of your own metal craft sheets to create beautiful fall cards or the ever-difficult masculine card, you can do so HERE.  I thank you in advance as I 
get credit for your purchase.  
Thank YOU!

Have a blessed day!  

Lee Ann  :)

Products used-
Stamps-Sweet 'n Sassy Stamps Across the Miles
Paper- PTI Rustic Cream, SU vellum and Early Espresso
Ink- Versamark
Other- Add a Little Dazzle Craft Metal Sheets, Sweet 'n Sassy Stamps Forest Silhouette Dies, MFT Fishtail Flag Stax Die-Namics, Gold ep, Tim Holtz embossing folder, Hemptique cord, SU faux wood buttons, Crystal Effects, SU ribbon


Friday, September 19, 2014

Stampendous and Add A Little Dazzle Blog Hop Day 5

Hello Everyone and welcome to our Grand Finale Blog Hop Day 5!
The Add A Little Dazzle and Stampendous Design Teams have one last round of inspiration for you today!  Hop along for a chance to win!


This card was a series of happy accidents!  I started by stamping the gorgeous evergreen bough in Versamark on Cherry Cobbler cs, and embossed it in gold.


 I wanted to make my branches snow covered but when I poured the Frantage Embossing Powder on the cs, it rolled around.  I was going to gather it back up, but noticed how much the large granules looked like a snowfall!  So rather than have snowy branches, I added falling snow.
I stamped the Stampendous Sentiment in Versamark on Glimmering Gold Craft Metal and embossed it in Early Espresso ep.  I wanted to get my metal nice and smooth, so I decided to run it through the Big Shot. What I did not realize is that when I did this, it would press my sentiment into the metal, giving it a wonderful etched or engraved look. Well, I LOVE it!  As this is a Christmas card, I am linking it up to the Addicted to Stamps Challenge Blog- "Holiday"

Make sure you visit the rest of the DT team blogs~
 

And you still have time to take advantage of Add A Little Dazzle's Stampendous Special- you get Add A Little Dazzle Craft Metal Sheets in the colors that the Add A Little Dazzle Design Team used in their projects this week.  In addition, you will also receive 1 pack of 25 gift package pillows in either large gift size or party favor size.  If you just have to try out these metal sheets, you can shop HERE.


And lastly, we cannot forget about the prizes!  

Enter for a chance to win a prize pack!  Be sure to stop by and comment on each of the design team blogs for a chance to win 1 of 6 prize packs from both companies!  You have until Sunday, September 21st to enter.  The winners will be announced on both company blogs the following week.  You must leave a comment on all blogs.


Thanks so much for hopping along with us!
Have a blessed weekend!

Lee Ann :)


More Sweet 'n Sassy Inspiration

Hello Everyone and Happy Friday!

I wasn't sure Friday was ever going to get here; what a week! But now we are looking at the weekend and I plan on getting crafty and doing some de-stressing. 

Today's card uses new dies from the latest Sweet 'n Sassy Release-


I started with a piece of mixed media paper and lightly traced 3 overlapping circles on it. I watercolored the circles, using a different color completely for the overlapped areas. Remember Venn Diagrams!?
Once the paper was dry, I stamped the tree from Forest Silhouettes.  The horizon line was added and a die cut deer from the new Forest Silhouette Dies was popped up on dimensionals.  The sentiment is also from Forest Silhouettes.
That's it; easy masculine card
I am linking this up to the Anything Goes Challenge at Seize the Birthday
Thanks so much for stopping by- enjoy all of the inspiration the rest of the team has for you!

Lee Ann  :)

Thursday, September 18, 2014

Not So Spooky Halloween

Hi Everyone!

Welcome to more inspiration with Top Dog Dies; it is already mid September and it will be Halloween before you know it.  It you are hosting a celebration for little people, here a a couple of quick and easy party ideas.


I used the Halloween Trio Die Set from Top Dog dies for both of these projects. 
For the pencil toppers, I die cut both the bat and the ghost shapes out twice from felt.  I ran a quick blanket stitch around the shape, leaving a small opening for the eraser end of the pencil to fit in.  Googlie eyes are the BEST way to finish off  these not-so-spooky pencil toppers!  :)
I used the same Halloween Trio Die Set to decorate my mason jar, only this time I used the negative space of the die.    Using vinyl (I bought a roll at Hobby Lobby), I first die cut out a Vintage A2 Mat Die from Top Dog Dies.  Then, from that vinyl Vintage A2 Mat Die I die cut the cat with the Halloween Trio Die Set.  Easy Peasy!  And the vinyl is so easy to stick down, and lift and reposition if necessary.  No adhesive required! 

That's it for me- as I said, easy peasy!
Have a blessed day!

Lee Ann  :)

Monday, September 15, 2014

Stampendous and Add A Little Dazzle Blog Hop Day 1


Hello Everyone and Welcome to the Stampendous and Add A Little Dazzle Blog Hop!  
We are so excited to share our creations with you, using both Stampendous Stamps and Add A Little Dazzle Craft Metal.

 
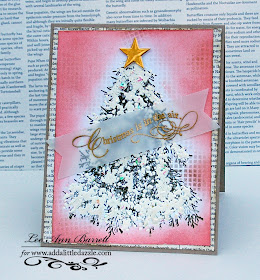
I strayed a bit from my norm and went shabby chic with this card.  The Stampendous image used is from the Jumbo Pinecone Boughs Set.


I used the smaller of the 2 boughs and stamped it repeatedly in the form of a pine tree, starting from the bottom and working my way up, to make a Christmas Tree.  I added lots of shabby chic goodness with the Stampendous Frantage Encrusted Jewel Kit in white. 
The background was sponged in pink; texture was added using drywall tape and kraft ink.  The edges of the panels were distressed and inked as well.  The sentiment is heat embossed in gold on a vellum banner.  The finishing touch was added with the placement of a gold star at the top of the tree, die cut from some Add A Little Dazzle Gold Glimmer Craft Metal
I love the shimmer of the craft metal, gold embossing, and Encrusted Jewels paired with the shabby chic colors and distressing.


Prize Alert!
Enter for a chance to win a prize pack!  Be sure to stop by and comment on each of the design team blogs for a chance to win 1 of 6 prize packs from both companies!  You have until Sunday, September 21st to enter.  The winners will be announced on both company blogs the following week.  You must leave a comment on all blogs.

Our teams have created some fabulous projects for you to enjoy so please grab your favorite beverage or snack and cozy up for a great blog hop.  Just follow the blog hop Design Team Members list at the end of the post.


Stampendous and Add A Little Dazzle Blog Hop Special!

During this week's blog hop we are offering a special pack of Add A Little Dazzle Craft Metal Sheets.  This pack includes metal sheet colors that the Dazzling Diva Design Team will be using in their projects throughout the week.  In addition, you will receive 1 pack of 25 pillows in either large gift size or party favor size.  
Order your Stampendous Blog Hop Pack today and receive exclusive PDF tutorials using Stampendous Products and Add A Little Dazzle Craft Metal Sheets.  This offer is only available this week.  Order your Stampendous Blog Hop Pack today!

Here is your Blog Hop List for Monday, Day 1-
 
Thank you so much for stopping by!  
Enjoy the hop and have a blessed week!

Lee Ann  :)


Friday, September 12, 2014

A Fall Release from Sweet 'n Sassy Stamps

Hi Everyone!
 Welcome to the Sweet 'n Sassy Stamps September Release! 
This release is all about fall!  There are lots of new sets and some new dies, some of which were released as Sweet Perks Bundles and are now available individually.

My first card uses the Skeleton Leaf Background Stamp and the new Leaf Silhouette Dies that coordinate with the previously released Leaf Silhouettes Stamp Set.


 I started by stamping the Skeleton Leaf Background on vellum with Versamark ink.  Then I added Sticky Powder and heated up the powder.  I burnished Gold Leafing into the Sticky Powder. 
My favorite white cardstock is Nature Gmund Savanna from CutCardStock; it has a wonderful woodgrain embossing.  I die cut one of the Silhouette Leaf Dies three times from this panel.  I added a Brushed Gold edge to the top and bottom of the panel, then adhered the vellum panel to the back of it.  The entire panel is popped up on dimensionals.
The sentiment is from the new So Grateful Stamp Set;  I love the fonts on this set.

I used the new  Falling Leaves Background Stamp on the next card~


In addition, I used the Tender Thoughts Stamp Set and Birch Forest Die Set; the Falling Leaves set coordinates beautifully with the Tender Thoughts set.   
This card took a bit of thought and trial and error (the first attempt ended up in the trash!).
First, stamp the Falling Leaves image on your white cs.  I stamped it a couple of times.  Next, heat emboss the forest image in clear ep directly over the leaves.  Lastly, watercolor the sky blue background.
I also stamped a forest floor of leaves for my deer to stand in.  To help the sentiment to stand out, I embossed it on a piece of vellum and used it as an overlay for the forest floor.

I used these new products on my cards-


http://www.sweetnsassystamps.com/so-grateful-clear-stamp-set/http://www.sweetnsassystamps.com/falling-leaves-clear-stamp-set/
                                            
http://www.sweetnsassystamps.com/skeleton-leaf-background-clear-stamp/http://www.sweetnsassystamps.com/leaf-silhouettes-die-set/

Two Chances to Win! 
~One random commenter from one of the Design Team blogs will be selected to win a $10 gift code to be used at the Sweet 'n Sassy Stamps store.  You have until Thursday, September 18th at midnight EST to leave your comments.  The winner will be posted on the Sweet 'n Sassy Stamps blog on Friday, September 19th. 
~Participate in our Release Day Challenge for another chance to win a $10 credit to the Sweet 'n Sassy Stamps store.  See the Sweet 'n Sassy Stamps blog for all of the details!

Hope you enjoy the hop and thanks so much for stopping by!
Have a blessed weekend!


Lee Ann  :)

Supplies Used
card 1-
Stamps-Sweet 'n Sassy Stamps Skeleton Leaf Background Stamp, So Grateful
Paper- Nature Gmund Savanna, SU Brushed Gold, SU vellum
Ink- Memento Tuxedo Black, Versamark
Other- SNSS Leaf Silhouette Dies, dimensionals, Sticky Powder, Gold Leaf
 card 2
Stamps- SNSS Falling Leaves, Tender Thoughts
Paper- Neenah Solar White, SU vellum
Ink- Versamark, More Mustard, Cajun Craze, Soft Suede, Soft Sky
Other- SNSS Birch Tree Dies, Early Espresso ep, SB mat dies

Thursday, September 11, 2014

BOO!

Hello Everyone!

I am enjoying everything fall-no the leaves have not started turning yet, but fall is in the air; I am ready for brisk weather and crunching leaves.
I have another Top Dog Dies Halloween project to share with you today; it is super CAS but I think it packs a big punch!


My spooky eyes are from the Top Dog Dies Pumpkin Album Finishers Die Set.  Yep!  I used my pumpkin eyes for this- I love getting more bang for my buck! I die cut the eyes twice- once out of the black background cardstock and a second time from white cs.  I used the inlaid die technique for the eyes.  Once they were adhered in place, I covered them with Crystal Effects.  My sentiment comes from a Recollections Sticker pack.  How easy is that!?  I hope you like it! 

Thanks so much for stopping by and have a blessed week! 

Lee Ann  :)

Wednesday, September 10, 2014

Falling for Dazzling Leaves

Hi Everyone!

Welcome!  Today's card is actually a two-fer; it is my card for this week's Add A Little Dazzle Challenge and it is a sneak peek at a new release coming from Sweet 'n Sassy Stamps on Friday!  If you joined the Sweet 'n Sassy Stamps Sweet Perks Club, you may have already seen this great addition to the fall goodies at Sweet 'n Sassy Stamps. It also is perfect for the challenge at Just Us Girls this week, which is 'Leaves'.


OK, so these leaf dies both cut and emboss; they are my new favorite dies!  Goodness, they are perfect for the Add A Little Dazzle Craft Metal Sheets and leave a gorgeous embossed impression on the leaf.  This is not the only leaf shape there is; there are several other styles.

The Add A Little Dazzle Challenge this week is to be inspired by this photo~


Leaves, leaves and more leaves, that is what I saw!  Actually, I love walking through the leaves during the fall- love the sound of their wonderful crunch under foot and the crisp fall air! 
I really wanted to change things up a bit and needed a new fall color combo.  So while I kept the leaves, I wanted to find something other than orange and yellow.  I was totally inspired by this photo from the Cure for the Monday Blues Challenge, so I went with it, even though it is too late to link up the card.  :)


Awesome colors, aren't they? 
I am also linking this up to The Mixed Media Card Challenge #3- Autumn Colors.


My card is made in a 'Chupa-esque' style.  I die cut my leaves from Golden Glimmer, Baby Blue and Brushed Bronze (my personal fave) Craft Metal Sheets from Add A Little Dazzle.  I die cut a wreath using a couple of circle dies and then adhered my leaves to the cardstock wreath.  Some were adhered with Crystal Effects and others with SU dimensionals.
I watered down some gold acrylic paint and spattered it on my PTI Rustic Cream cs.  I used my SU Melon Mambo marker and color spritzer to add more spatter to the cs.
The sentiment is from Sweet 'n Sassy Stamps Leaf Silhouette Stamp Set; I have embossed it in gold on vellum.
If you just have to have some of your own metal to make your fall leaves, 
you can do so HERE.  I thank you in advance as I get credit for your purchase. 
 Thank You! 

Have a blessed day!

Lee Ann  :)

Products Used-
Stamps- Sweet 'n Sassy Stamps Leaf Silhouettes
Paper-PTI Rustic Cream. SU Baja Breeze, Crumb Cake, Soft Suede, Vellum and retired dsp
Ink- Versamark
Other- Add A Little Dazzle Craft Metal, Sweet 'n Sassy Stamps Leaf Silhouette Dies, Sweet 'n Sassy Stamps Scallop Border Dies, SU Melon Mambo marker and color spritzer, gold acrylic paint, seam binding, SU polka dot ef, gold ep, dimensionals, MFT Circle Stax and Fish Tail Flag Stax Die-Namics

Thursday, September 4, 2014

I'm Batty for Top Dog Dies!

Hey Everyone!

It's hard to believe we are into the month of September!  Before you know it, trick or treaters will be knocking on our doors! 
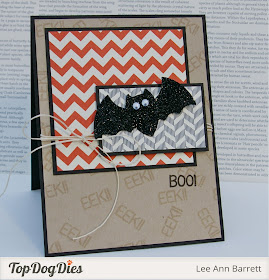
I used the fun Halloween Trio Die Set from Top Dog Dies for my not-so-spooky card.  The dies are just the right size for cards and for scrapbooking your Halloween pics. 


 I die cut this batty guy from a layer of black cardstock with double sided tape on it.  Then I covered the double sided adhesive with black glitter.  Googlie eyes finished him off!
The back panel is stamped with sentiments from Sweet 'n Sassy Stamps Buggin' Ya Stamp Set. 

Thanks so much for stopping by and have a blessed week!

Lee Ann  :)

Wednesday, September 3, 2014

Lots and Lots of Glitter!

Hello and Happy Hump Day!

It's Wednesday and that means a new challenge is up at Add A Little Dazzle.  This week's challenge was waaaay outside my comfort zone as we were working with lots and lots of glitter!


The technique we ( the Design Team) used is actually very cool as your glittered image becomes inlaid in all glitter.  And I have a confession to make; after making this card I went out and bought more glitter! As if there wasn't enough glitz and shine with the glitter, I die cut my JOY letters out of Golden Glimmer Craft Metal Sheet.  I just love how the letters reflect the light and compliment all of the glitter wonderfully. 
So, how did I make this?  Well, you start off by covering your desired piece of cardstock with double sided adhesive.  Then you prep your stencil so that it can be lifted from the adhesive with relative ease; in this case, the plastic stencil was inked up with Versamark.  Once you have done this, you lay the stencil over the adhesive covered cs.  Now the fun begins and you can add glitter in any color(s) that you want.  Be sure to add the glitter one color at a time, removing the excess glitter before adding another color.  I burnished my glitter as I went, to give it a smooth look.  Once you have covered your entire image, you remove the stencil and then fill in all of the empty space with more glitter, in this case clear glitter. 
I adhered my Golden Glimmer Craft Metal Sheet letters with Crystal Effects.
This week's code word at Addicted to CAS is~

Silver and gold equals luxury!  I think of glitz and glamor as well.  What do you think of when you think luxury?
Lesley's sketch at The Challenge was perfect for this technique~

The girls over at Jingle Belles have a great theme this week, 'Baby, it's Gold outside".  What a fun theme and play on words! 
That's it!  I hope you give this technique a try; it sure was fun!  Then be sure to link your creation up to the Add A Little Dazzle Blog!  As usual, you have a chance to win a certificate to the Add A Little Dazzle Boutique.  You do not have to use Craft Metal Sheets to play along, but if you have some, we would sure love it if you used it!
If you are interested in purchasing Add A Little Dazzle Craft Metal Sheets, you can do so HERE.  I thank you in advance, as I will get credit for your purchase. 

Thanks so much for stopping by; hope to see your beautiful creation linked up to our challenge!

Lee Ann  :)

Supplies Used-
Stamps- none
Paper- SUBasic Gray, Naturals Ivory
Ink- none
Other- Add A Little Dazzle Craft Metal Sheet, Martha Stewart fine clear glitter, Recollections silver and gold glitter, Crystal Effects, MFT letter dies, stencil (from home decorating department). 

Monday, September 1, 2014

Just CAS

Hi everyone!

Hope everyone is having a great Labor Day!  I got some chores done, and then decided to craft.  Only problem is, I have been MOJO-less for a week plus now.
I set out to make a card for the challenge on the Butterfly Reflections Ink Blog.  I stamped and masked and die cut and painted- all with nothing to show for it.  Somehow, I ended up with this CAS card, made with this Sweet 'n Sassy Stamps image, Flowers in Bloom.


WAIT!  I know what you are thinking!  What kind of horrible coloring is that?!  Well, it really is not colored.  I thought I would try something totally outside the box and 'color' this image with the images from the Sweet 'n Sassy Stamps Grunge Elements Set. 
Here are the stamps I used to add color to my flowers~


With watercoloring being so trendy right now, I thought this would be a quick way to add color to an image that looked a bit like watercoloring without the watercoloring!
The background was colored with Copics.  
Here is the mood board I used for inspiration.  I was inspired by the colors~


And while I love summer because I am off of work, I really, really love fall.  One of favorite things to do is go to the botanical gardens in the fall.  Cone flowers are usually one of the last flowers blooming. 
Thanks so much for stopping by and have a blessed week!  Happy Fall!

Lee Ann  :)