Tuesday, September 3, 2013

Going Country with Heartfelt Creations

Hello again!  Today's Heartfelt Inspiration has a bit of a country flair to it; I have used the gorgeous holly images for both cards that I have to share.  One is CAS and the other is not so CAS.


The gorgeous holly images are perfect for framing your Christmas sentiments.  In the first card, the berries and candle image are colored with Prismacolor pencils.  In the second, CAS card, the berries are colored withViva Decor 3D Stamp Paint.
For complete instructions and products used, see the end of this post.  Don't forget to check out all of the gorgeous inspiration from the rest of the Design Team on the Heartfelt Creations blog.  

Thanks so much for visiting and have a blessed week!

Lee Ann  :)

 
Country Candle

Heartfelt Creations Supplies used-
Holly Berry Precut Set- HCPC 3551 
Bright Christmas Precut Set- HCPC 3552 
Decorative Oval Window Die- HCD  
Ornamental Add On Die- HDC 738
Heartfelt Creations Daphne Paper Collection HCDP1 234

Spellbinders Twisted Metal Tags and Accents 
Spellbinders Circle Nestabilities dies
Other Products used-
Stampin' Up Crumb Cake and glitter paper, Neenah Solar White cs, Memento Tuxedo Black ink, SU white craft ink and Early Espresso ink, Van Dyke Brown ink, scoring tool, SU Vintage Wallpaper ef, SU Borders Scoring Plate, Prismacolor Pencils, sewing machine

Instructions-
Cut Crumb Cake cs to 4.25 x 11 and fold in half for cardbase. Cut another piece of Crumb Cake cs to 3 x 4.25 and emboss with ef. Lightly sponge white craft ink over raised areas of cs. Sew card stock to center of card base; be sure to leave enough room at bottom of card for sentiment. I have about 1 3/8 “ at the bottom of my card. Stamp sentiment in Early Espresso ink to bottom of card. Score lines on the sides of the sentiment. Using the Borders Scoring Tool, score the decorative edge to the top of the card.
Stamp 3 medium holly sprigs in black ink, color the berries with Prismacolor Pencils and die cut out with matching die. Die cut SB flourish from glitter paper. Die cut Decorative Oval Window die from brown Daphne Paper Collection.
Stamp the image in black ink and color with Prismacolor Pencils. Diecut image with circle die. Sponge edges of circle with Van Dyke brown ink.
 To assemble, cut window die around the flourishes in the center, bringing to two pieces together to create a circle frame for the image. Nestle the candle image in the circle frame and adhere to the embossed Crumb Cake panel. Adhere one sprig of holly to the right lower corner of the circle frame. Adhere the remaining 2 sprigs of holly and the glitter flourish to the left side of the circle frame. 

 
Folk Art Christmas

Heartfelt Creations Products used-
Love at Christmas Precut Set- HCPC 3554
 Holly Berry Precut Set- HCPC 3551
Ornamental Add On Dies- HCD 738
Viva décor Carmine Red 3D Stamp Paint
 Spellbinders Circle Nestabilities
Spellinders Classic Scallop Circle Nestabilities

Other Products used-
White cs, Stampin' Up Crumb Cake cs, Crumb Cake ink, Early Espresso ink, Versamark, clear ep, scoring tool, pearls, dimensionals, stamp-a-ma-jig

Instructions-
Fold 5.5 X 8.5 piece of white cs in half for card base. Score around edges of card. Die cut scalloped circle from Crumb Cake (kraft) cs. Stamp folk art wreath in kraft ink on white cs and die cut out with circle die. Die cut out center of wreath as well. Die cut center of kraft circle out and layer the white circle on the kraft scalloped circle and adhere together. Position circles/wreath on card base to determine where you will stamp sentiment. I used a Stamp-a-ma-jig for placement of my sentiment. Stamp sentiment in Early Espresso ink on card base. Adhere wreath around sentiment. Add pink pearls to wreath.
Stamp large holly sprig onto kraft cs. To do this, first ink up image with Versamark then immediately following, ink with Early Espresso (dark brown) ink. Stamp image on cs and then heat emboss with clear ep. Die cut image out. Paint holly berries with 3D stamp paint. Adhere to card with dimensionals.

Saturday, August 31, 2013

Playing with Pattern

Good Morning!
I hope you are having a wonderful start to your Labor Day weekend!  It is hard to believe we have been back to school for 2 weeks already; fall is quickly approaching.
This morning I played along in a special challenge at SCS.  Stef has been hosting the Inspiration Challenge for several years now, and today is her last challenge, as she will be passing the torch on to another SCS challenge player, Audrie. She has inspired so many over the years. 
Today's inspiration site is chock full of wonderful products to inspire the creative mind.  I was actually inspired by the entire site- I love the symmetry and mirror imaging used in so many of their patterns.  I think this piece best represents the inspiration I used.


Thanks so much for stopping by and have a blessed weekend!

Lee Ann  :)

Products Used-
Stamps-Verve
Paper-Flourishes white cs, Stampin' Up Naturals Ivory and Soft Sky, Basic Gray dp
Ink- Memento black
Other- Spellbinders dies and embossing folder, Stampin' Up seam binding, pearl flourish

Tuesday, August 27, 2013

Heartfelt Holly

Hello and Welcome to another Heartfelt Inspiration Wednesday!

Today it is all about the holly, and Heartfelt Creations' new holly images are gorgeous!


 I colored my holly swirls with Copics and die cut them with the coordinating dies. The sentiment is embossed in black.  See complete instructions below.

Thanks so much for visiting my blog!  For more amazing inspiration from the Design Team, please check out the Heartfelt Creations blog.  

Have a blessed week! 

Lee Ann  :)

Heartfelt Creations Products used-
Holly Berry Precut Set- HCPC 3551
Bright Christmas Precut Set- HCPC 3552
Ornamental Add On Die- HCD 738
Spellbinders Circle nesties, Classic Scalloped Circle nesties, Classic Petal Edgeablilities

Other Products used- Sizzix woodgrain ef and foliage ef, Stampin' Up Whisper White and Real Red cs, Flourishes white cs, Memento Tuxedo Black ink, Stampin' Up black craft ink, black ep, dimensionals, Stampendous Crystal Snow glitter, Copic markers R20, R24, R29, G20, G24, G28, YG67

Instructions-
Stamp 1 large holly sprig, 1 medium holly sprig and 2 small holly sprigs on white cs with Tuxedo black ink, color with Copics, and die cut out with matching Ornamental Add On dies. Set aside. Fold 11” x 4.25” red cs in half for card base. Cut white cs for background mat and emboss. Adhere to card base. Cut 1 3/4” strip of white cs and emboss with woodgrain ef. Cut to width of white mat. Add red mat to top of strip of white cs. Cut red strip of cs with Petal Edgeabilites die and use as mat to bottom edge of white strip. Ahere white strip with red trim to card base. Stamp sentiment in black craft ink and emboss with black ep. Cut with circle nestie. Die cut scalloped circle in red; mat sentiment with red scalloped circle. Adhere to card with dimensionals. Lower edge of scalloped circle should be about even with petal edge of white/red strip.
Adhere medium holly sprig to left lower corner of circle. Cut 2 petals at base of large holly sprig off. Add one of them to right of medium holly sprig, tucking cut edge under petal edge. Adhere large holly sprig to right upper corner. Adhere 2 small holly sprigs, one on each side of large sprig. Pop up berries and leaves with dimensionals. Add small amount of glitter to each holly berry.

Sunday, August 25, 2013

Elegant Sympathy

Hello!  I have a quick post for you today; I have had a busy weekend getting ready for a visit from my parents.  I worked in a card for the Featured Stamper challenge on Splitcoaststamper.
I used an Our Daily Bread Designs image and a Heartfelt Creations sentiment for my card-


 I used reinkers and a waterbrush to color the poppy. I spot colored the poppy center with a Versamark marker and then heat embossed it with black embossing powder.

Thanks so much for stopping by my blog!

Have a blessed Sunday!

Lee Ann  :)

Supplies Used-
Stamps- Mother's Day- Our Daily Bread Designs; Classic Message Precut Set- Heartfelt Creations
Paper- Stampin' Up Basic Black, Very Vanilla, Modern Medley dsp; Flourishes white cs
Ink-Old Olive, Poppy Parade (reinkers), Memento black
Other- Versamark marker, black ep, Spellbinders M-bossability folder-Ornamental Iron, Spellbinders Label One Dies

Tuesday, August 20, 2013

Deck the Halls

Hello and Welcome to another Wednesday of Heartfelt Inspiration!
Today I have a fun Christmas project to share with you using the newest Heartfelt Creation dies.
I have quite a few pictures to show you what I have done, so as not to confuse you with verbage!

My Christmas Tree Topper is made with Spellbinder Dies, Heartfelt Creations Ornamental Add On dies, and a toilet paper tube!
So, here we go!
Cut an empty toilet paper roll from top to bottom; curl cardboard to desired size, making a funnel of sorts, with the top opening being narrower than the bottom opening. Adhere cut sides together with Scor Pal adhesive. Next, make a loop in the middle of a piece of floral wire by wrapping the wire around your finger so that the ends meet. Twist the wire so that you have a loop that will be sandwiched between 2 cardstock circles measuring about 2 inches in diameter. Twist the wire for about a distance of 2 inches.
Using a small punch (I used a 1/16th inch hole punch). Punch a hole on both sides of your cardboard cone. Consider your seam to be the back of the cone.


 Holes should be about 1 3/4” from the top edge of the cone. Put a slight bend in the 2 ends of your wire and feed the looped wire up through the cone. Insert the ends of the wire into the holes and lay them flat against the outside of the cone. If your wire is long enough that it extends beyond the bottom of the cone, curl the wires back up into the cone from the bottom edge.
Die cut these shapes from silver glitter paper (you could also use chip board and heat emboss it or cover it in glitter)-
2 approx 2 inch circles
1 Picot Edge circle, approx 1 1/2” in diameter
14 of the flourished petals from the Heartfelt Creations Die set

Make a template from plain cs to wrap your cone. Use template to cut out paper from Christmas Card Collection. Using Mod Podge, glue plain cs to cone. Once dry, glue designer paper to cone. Cover with a layer of Mod Podge and let dry.
 

With 10 of your die cut petals, glue 2 together (wrong sides together) creating 5 2-sided petals. Apply Scor Pal tape to entire back surface of one of your 2 inch circles. Lay looped wire on taped surface of circle die cut and push it into adhesive. Apply Scor Pal tape over wire loop and press it into circle die cut. Adhere 5 petals around edge of circle (this is why you need tape over entire surface of circle die cut). With your remaining 2 inch circle, cover entire back surface with Scor Pal tape and adhere directly over first circle so that petals and wire will be sandwiched inbetween 2 circles. 


With remaining 4 petals, I trimmed off the lowest, longest flourished segments, as I wanted a more open and airy look. I used these trimmed off pieces to decorate the top of my cone; I adhered the pieces with Mod Podge. These remaining trimmed petals were placed inbetween the original petals and adhered to the circle with glue dots. The Picot Edge Circle was then adhered over these ends and in the center of the 2 inch circle. I used a pop up glue dot for dimension.


 A decorative brad was added; I used a wire cutter to trim off some of the prongs and adhered it with a large glue dot. Lastly, tinsel twine was wrapped twice around the top of the cone.

I hope that made some sense to you!  Feel free to ask any questions that you may have.  
Thanks so much for stopping by! Check out all of the amazing inspiration from the rest of the Design Team on the Heartfelt Creations blog. 

Have a blessed week!

Lee Ann  :)

 
Heartfelt Creations Products used-
Ornamental Add On Dies-HCD 738
Christmas Card Collection paper

Spellbinders Picot Edge Circles Nestabilities
Spellbinders Circle Dies

Other Products used-Stampin' Up silver glitter cs, toilet paper roll, floral stem wire 20g, Tim Holtz Tinsel Twine, Paper Studio gemstone flower brads, Mod Podge, glue dots, Scor Pal adhesive

Summer Fun and Sweet 'n Sassy

RCC84 - Week 2

Hello everyone!  This is week 3 of the monthly challenge and this month we are looking for some
 Summertime Fun!


So what  prize is up for grabs? How about a Ribbon Carousel?!
 Each month we are giving away a Ribbon Carousel to one of our randomly chosen challenge participants! 

Just a reminder that our Ribbon Carousel Crewmates have divided up into FOUR teams.  Each week you will see fresh projects for this month's challenge!

There are three rules to be eligible for the prize:
1.  You MUST use ribbon or twine on your creation.
2. Your project must be based on the theme of the month.
 3. You must add  a NEW project  to the inlinkz below and link directly back to your project on your blog or online gallery.

Check out some crafty eye candy from our talented Crewmates here for a little inspiration before you link up your project to THIS POST HERE!

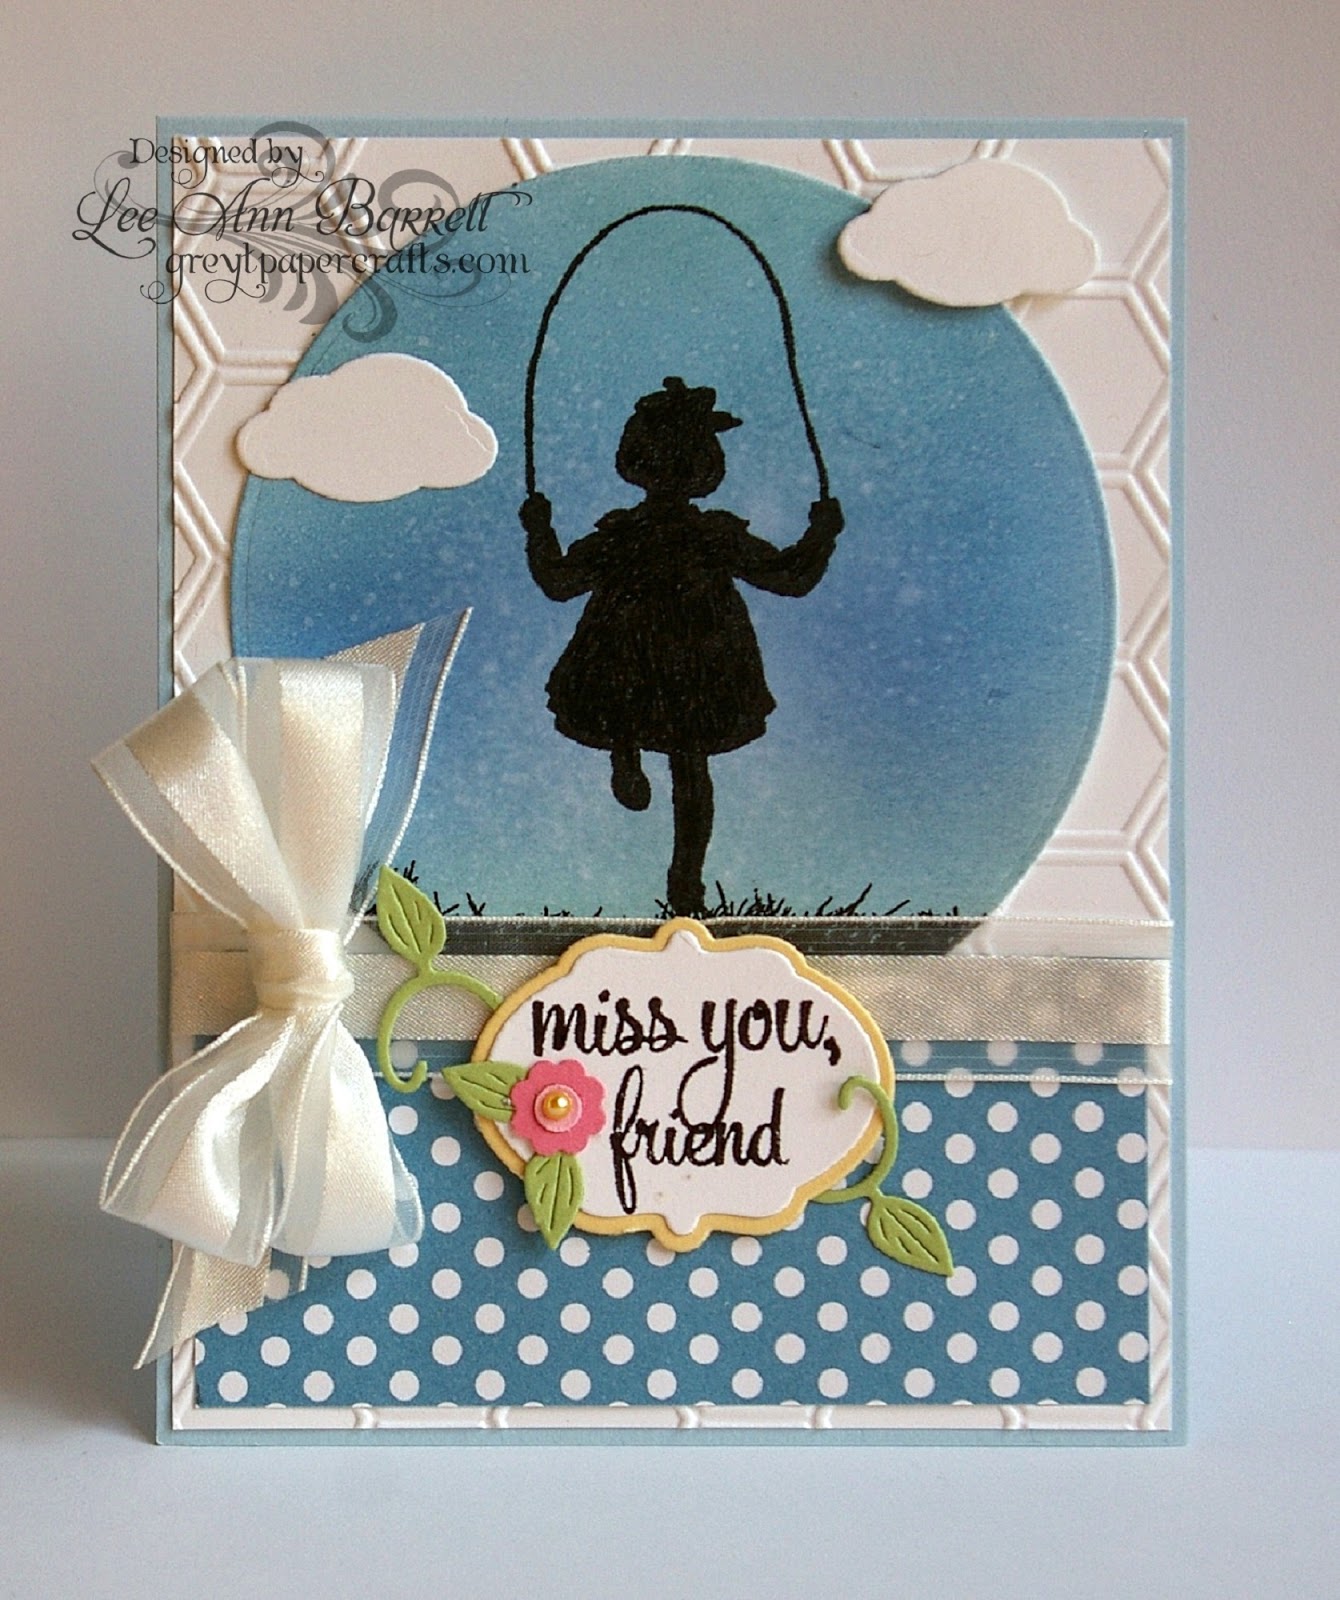
 I can remember as a child, playing for hours outside during the summer, be it Hide and Seek, Mother May I, jumping rope, or riding bikes.  This sentimental silhouette image from Sweet 'n Sassy stamps reminds me of those summers.  


 I sponged my paper using Soft Sky, Bashful Blue, Ballet Blue, Brocade Blue, Island Indigo and Pool Party.  Then I spritzed my background with water to get a slightly pebbled effect.  You can see this Sponge and Spritz tutorial on Splitcoaststampers.
Thanks so much for stopping by and have a blessed day!
Lee Ann  :)
Supplies used-
Stamps-Sweet 'n Sassy Stamps  His Child and Across the Miles
Paper- Stampin' Up Bashful Blue, Cetainly Celery, Barely Banana, Pretty in Pink, Regal Rose, Whisper White, Polka Dot Parade Designer Series Paper
Ink-Bashful Blue, Ballet Blue, Brocade Blue, Soft Sky, Pool Party, Island Indigo, Basic Black, Versafine Black
Other-SU Honeycomb ef, SU white ribbon, SU Itty Bitty Punch Pack, Cheery Lynn Designs Flourish die, MFT Circle STax Die-Namics, Sweet .n Sassy Stamps Cloud and Raindrop dies, Verve Mini Vintage Oval Die


Tuesday, August 13, 2013

Christmas Release with Heartfelt Creations

Hello and Welcome to another Heartfelt Creations Inspiration Wednesday!
We are pleased to present the Christmas Card Collection. The Christmas Card paper pad has 76 card fronts that will enable you to create quick and easy Christmas cards that are embellished or simple- you pick! This paper pack is a fantastic solution for getting the most beautiful cards for the least amount of time. If you don’t need one side, flip it over and use the other side! The coloring is done for you. There are many panels for utmost variety and the best  selection. The stamps and dies released with this collection are absolutely festive and ornamental. The gorgeous type and frames will help you create the most beautiful Christmas project your friends have ever seen!
Leave a comment on the Heartfelt Creations blog by August 20th to be eligible to win the entire collection.


This sweet winter bird was colored with Copics and fussy cut out. The small snow flakes were embossed in silver on the wintry blue dp and the large, central snow flake was made using the new Ornamental Die Add Ons.  You can find detailed instructions below. 
Visit the Heartfelt Creations blog for more gorgeous inspiration from the Design Team!

Thanks so much form visiting and have a blessed week!

Lee Ann  :)

Heartfelt Creations Supplies used-
Christmas Song Precut Set- HCPC 3556
Winter Season Precut Set-H CPC 3543
Ornamental Add On Dies- HCD 738
Christmas Card Collection Papers-HCDP1 236

Other Products used-
White cs, vellum cs, Versamark, Memento Tuxedo Black ink, Copic markers, silver ep, dimensionals, bling, Recollections pearl flourish

Instructions-
Fold 12 x 6 piece of white CS in half to create card base. Cut background mat from blue designer paper and stamp several times with snowflake stamp and Versamark ink. Emboss with silver ep and adhere to card base.
Die cut 5 decorative die pieces from white cs. Die cut/punch a circle from white cs. Arrange decorative die pieces around circle piece and adhere to create large snowflake. Stamp bird image in black and color with Copics. Fussy cut out image. Stamp sentiment in Versamark on vellum and heat emboss with silver ep. Die cut/punch out circle shape. Adhere on top of circle center of snowflake. Arrange snowflake and bird image on card and adhere. Bird is adhered with dimensionals. Add bling to snowflake. Add pearl flourish to card base.
Related Posts Plugin for WordPress, Blogger...